
A Practical Guide to Mastering Your Ticket Form Zendesk
Build, customize, and automate your ticket form Zendesk. This guide covers conditional logic, triggers, and best practices to improve customer support.A well-designed ticket form in Zendesk isn't just a way for customers to contact you; it's the very foundation of your entire support operation. Think of it as the digital receptionist that sorts and directs every single customer issue before an agent even lays eyes on it. It’s the first—and most important—step toward creating a great customer experience and a super-efficient team.
Why Your Zendesk Ticket Form Is More Than Just a Form
It’s easy to dismiss a web form as a minor detail, just a necessary box to check in the support process. But treating your Zendesk ticket form as an afterthought means you're missing a huge opportunity to directly impact your support metrics and operational sanity.

The way you structure this form has a direct, measurable impact on how quickly you can respond to customers. A smart form acts like a triage nurse, gathering all the critical information upfront. This ensures tickets land in the right agent's queue, ready for a fast resolution, and helps you avoid the dreaded "ticket bounce"—where an issue gets passed around from agent to agent, annoying both your team and your customer.
The Strategic Value of a Well-Crafted Form
Every single field you add (or get rid of) does more than just collect information. It guides your customer, sets their expectations, and gives your agents the context they need to be helpful from the very first reply. This initial data grab is core to how Zendesk works.
While Zendesk originally became popular for its simple email-to-ticket feature, the addition of structured ticket forms was a game-changer. It moved support from a reactive sorting game to a proactive information-gathering process. You can actually see this shift if you explore the evolution of customer service tools.
A well-planned form is also the secret to clean, useful analytics. The data you collect here feeds directly into your reports in Zendesk Explore, helping you spot trends, flag product bugs, and measure your team's performance accurately. Without it, you're just looking at a mess of unreliable data.
The difference between a generic, out-of-the-box form and one you’ve thoughtfully customized is night and day. It affects everything from agent workload to customer satisfaction.
Generic vs Optimized Zendesk Ticket Forms
| Feature | Generic Form (Default) | Optimized Form (Customized) |
|---|---|---|
| Data Collection | Asks for basic contact info and a long description. | Gathers specific, relevant details using conditional fields. |
| Ticket Routing | All tickets land in a single, general queue. | Automatically routes tickets to specialized teams (e.g., Billing, Tech Support). |
| Agent Effort | Agents spend time asking basic follow-up questions. | Agents have all necessary info upfront, reducing back-and-forth. |
| First Response Time | Slower, as tickets need manual sorting and triage. | Significantly faster due to automated routing and rich context. |
| Analytics | Data is messy, making it hard to identify trends. | Clean, structured data provides clear insights into issues and performance. |
| Customer Experience | Can be frustrating; customers repeat information. | Smooth and efficient; customers feel heard and understood from the start. |
Moving to an optimized form is one of the highest-impact changes you can make to your support workflow.
A great ticket form doesn't just ask questions; it provides answers. By anticipating the needs of both the customer and the support agent, it creates a path of least resistance to a successful resolution.
Ultimately, putting real thought into your ticket form in Zendesk is about building a support system that can grow with you. It cuts down on manual work for your agents, keeps your data clean, and frees up your team to focus on what they do best: solving customer problems quickly and effectively. It’s the foundational piece that prevents chaos and sets the stage for a helpful conversation every single time.
Alright, let's roll up our sleeves and get practical. It’s one thing to talk about custom ticket forms, but it’s another to actually build one. We're going to walk through creating a form from scratch in Zendesk, moving past the default setup to something that truly works for you.
This isn't as intimidating as it sounds. It's the first real step toward a support workflow that's less about chasing information and more about solving problems.
For this guide, we’ll build a classic: a 'Technical Support Request' form. The goal here is simple but powerful—get all the crucial details upfront so your tech team can hit the ground running. No more back-and-forth emails just to figure out what device someone is using. This alone can slash your resolution times.
Getting to the Ticket Forms Admin Center
First things first, you need to know where to go. All the magic happens in your Zendesk Admin Center, which is basically the command center for your entire support operation.
- From the sidebar, click the Objects and rules icon (it looks like a square with a circle inside).
- Then, head over to Tickets > Forms.
- You'll see a button labeled Add form. Go ahead and click it.
This opens up a fresh canvas. The first thing you'll do is give your form a name. Let's call it "Technical Support Request." Pick a name that’s obvious to both your team and your customers—clarity is key.
Here’s what that main ticket forms page looks like. It’s where you’ll manage all your forms once you start building them out.
From this screen, you can see how you'll eventually be able to add new forms, duplicate existing ones, and even control the order they appear in for your customers.
Adding Your Fields: The Building Blocks
Once you've created the form itself, it’s time to add the fields. Zendesk gives you the standard stuff like Requester, Subject, and Description. But the real power comes from creating your own custom ticket fields.
Let's add a few essentials to our 'Technical Support Request' form to see how it works:
- Product Area (Dropdown): This is a game-changer. It’s a simple dropdown menu that lets customers pick which part of your service is giving them trouble (e.g., 'Software,' 'Hardware,' 'Account Login'). Just this one field can automatically route tickets to the right team. Huge time-saver.
- Device Model (Text Field): A simple text field where someone can type in their device model. This is critical context for any kind of hardware or software issue.
- Troubleshooting Steps Taken (Checkbox): This lets you confirm if a customer has already tried the basics. You could have a single checkbox that says, "I have tried restarting the device." This stops your agents from looking silly by suggesting something the customer has already done.
As you add each field, you'll see options to configure its properties. This is where you get to fine-tune how you collect data and what the customer experience feels like.
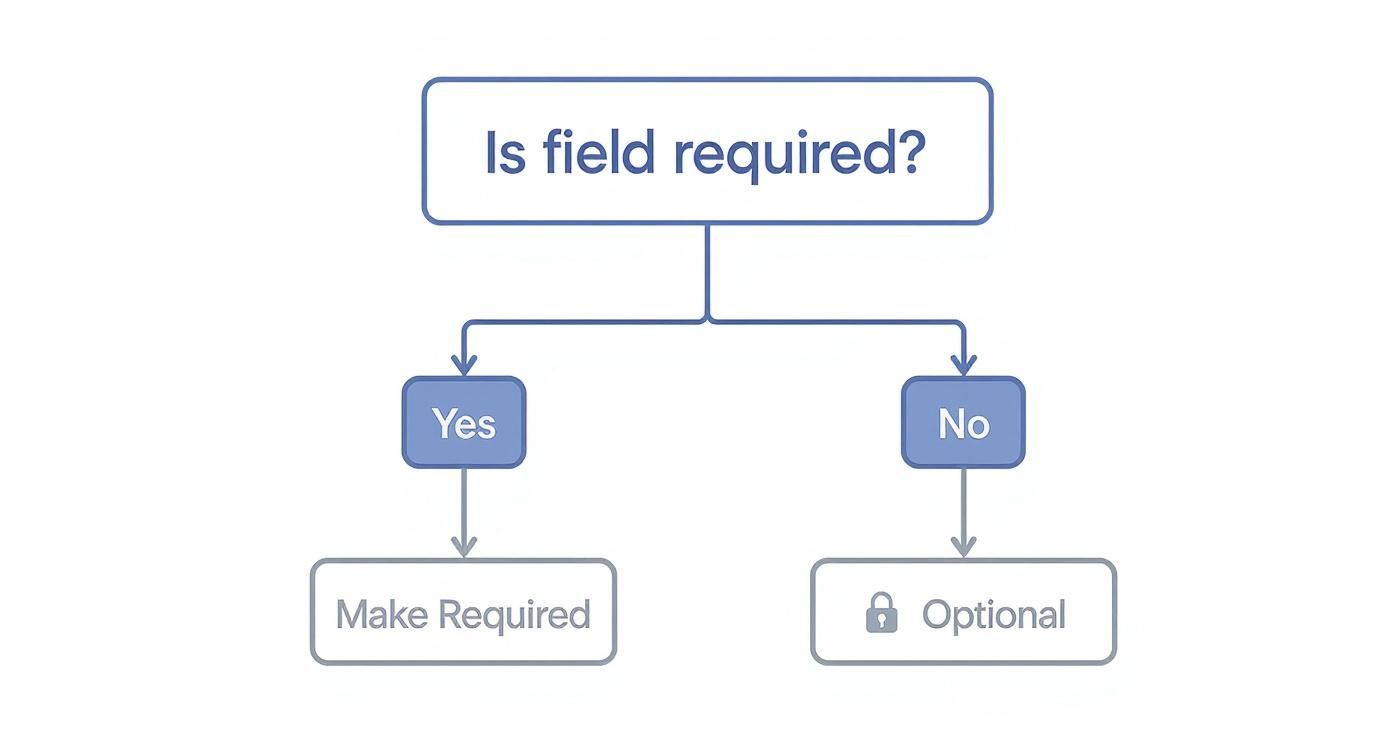
Configuring Field Properties: Required vs. Optional
For every field you add, you have to make a choice: is it required or optional? This is a bigger deal than it seems. You're balancing your team's need for information against the customer's effort.
Making a field 'required' forces the customer to give you that info before they can submit their ticket. Use this power wisely. Only make something required if it's absolutely, positively essential for your team to even begin working.
For instance, our 'Product Area' dropdown is a perfect candidate to be required. Without it, the ticket is basically dead in the water until someone figures out where it belongs.
On the other hand, the 'Device Model' field might be better off as optional. A customer might not know the exact model number, and if the field is required, they might just give up and not submit the ticket at all.
Here’s a good rule of thumb I always use: ask yourself, "Can my agent take the very first step toward a solution without this piece of information?" If the answer is no, make it required. That simple test will help you build a form that's efficient for your team and doesn't frustrate your customers.
Making Your Forms Smarter with Conditional Logic
Once you have your basic fields in place, you can start making your ticket form in Zendesk truly dynamic. This is where you move beyond simple data collection and create an intelligent, guided experience for your customers. The secret is using conditional ticket fields, a powerful feature that shows or hides specific fields based on what a user selects.
Think of it like a natural conversation. You wouldn't ask someone for an invoice number if they're reporting a website bug. Conditional logic makes sure your form is just as smart, creating a clean, relevant path for every user by only asking for what you actually need.
From Static to Dynamic: Why It Matters
A static form throws every possible question at the user all at once. Someone with a simple billing question might see fields for "Operating System" or "Browser Version" and get completely thrown off. This kind of friction often leads to people giving up on the form altogether.
Conditional logic flips the script. When a customer selects 'Billing Inquiry' from a dropdown, a field for 'Invoice Number' can instantly appear. If they choose 'Technical Issue' instead, you can then prompt them for their 'Device Model' and 'Software Version.'
This approach delivers two huge wins:
- It drastically improves the user experience by cutting out the clutter and confusion.
- It ensures your support team gets exactly the right information for that specific type of issue, right from the start.
Ultimately, this means less back-and-forth and faster resolutions. Your agents get the full picture immediately, which is a game-changer for efficiency.
Building Your First Conditional Rule
Setting up these "if-this-then-that" rules is probably easier than you think. Let's walk through a real-world example for a law firm.
Imagine their main form needs to handle both 'New Client Inquiries' and 'Existing Client Document Requests.'
First, you’d create a required dropdown field called “How can we help?” with those two options. This is your "control" field that will dictate what happens next.
Next, you create the fields that only apply to one path or the other. For a 'New Client Inquiry,' you might add fields like "Case Type" (e.g., Family Law, Corporate, Real Estate) and "Best Time to Call." For 'Existing Client Document Requests,' you'd add a text field for "Case File Number."
Finally, you connect the logic. You’ll set a condition on the "Case Type" field that says: Show this field ONLY IF 'How can we help?' is 'New Client Inquiry'. You’d do the same for the "Best Time to Call" field. For the "Case File Number" field, the condition would be: Show this field ONLY IF 'How can we help?' is 'Existing Client Document Requests'.
Just like that, you’ve built two unique workflows into a single form, making sure potential new clients and current clients see only what’s relevant to them.
By creating these branching paths, you're essentially pre-triaging tickets before they even land in an agent's queue. A 'New Client Inquiry' could be automatically routed to your intake team, while a 'Document Request' might go straight to a paralegal.
This simple decision-making process is the foundation of smart form design.
This flowchart shows the basic choice you make for every field, which is the starting point for layering in more complex conditional rules.
Best Practices for Conditional Fields
As you get more ambitious with your forms, a few ground rules will save you a lot of headaches.
- Sketch It Out First: Before you even log into Zendesk, grab a whiteboard or a notepad. Map out the different paths a user can take. What are the key questions for each branch? A little planning goes a long way and prevents you from building a confusing maze.
- Keep It Simple: It’s easy to get carried away and create deeply nested conditions (a condition that triggers another, which triggers another). As a rule of thumb, try to stick to two or three levels deep at most. Overly complex forms are a nightmare to maintain and can frustrate users.
- Provide an Escape Hatch: What happens if a user's issue doesn't fit your categories? Always include an "Other" option in your main dropdown. This can reveal a simple text box, ensuring you have a catch-all for unique situations.
- Test Every Single Path: Once your form is built, become the customer. Click through every possible combination of answers to make sure the right fields show up and disappear exactly when they should.
When you thoughtfully implement conditional logic, your ticket form in Zendesk becomes a powerful tool that improves the customer experience and gives your team everything they need to be successful from the very first contact.
Automating Workflows With Triggers and Integrations
<iframe width="100%" style="aspect-ratio: 16 / 9;" src="https://www.youtube.com/embed/qtds_8C_2Ag" frameborder="0" allow="autoplay; encrypted-media" allowfullscreen></iframe>A great form collects the right data, but great automation is what actually puts that data to work. Simply gathering information with your ticket form in Zendesk is only half the job. The real power is unleashed when you hook those form submissions into Zendesk’s automation engine, turning that static data into real, time-saving actions.
This is how you build a support system that reacts and adapts on the fly. It handles all the repetitive, manual tasks so your agents can stay focused on solving the truly complex problems. It's the difference between a reactive support queue and a proactive, well-oiled machine.
Using Triggers for Smart Ticket Routing
Think of Zendesk Triggers as simple "if this, then that" rules that fire the instant a ticket is created or updated. When you combine them with a well-designed custom form, they become incredibly powerful. You can build triggers that react to the specific answers your customers provide, automating tasks that would otherwise eat up an agent's valuable time.
Let's look at a real-world scenario. Say a SaaS company has a form with a custom dropdown field called "Issue Type," and one of the options is "System Outage." That’s a five-alarm fire.
You can set up a trigger that does the following:
- Condition: If
Ticket FormisTechnical Support RequestANDIssue TypeisSystem Outage. - Action 1: Set
PrioritytoUrgent. - Action 2:
Notify groupOn-Call Engineering Team.
Just like that, a critical issue gets escalated instantly, without a single agent ever having to touch it. This is how you slash response times for your most important problems.
A well-configured trigger acts like an automated triage specialist. It sorts, prioritizes, and escalates tickets based on the information provided in the form, making sure the right eyes are on the right problem almost immediately.
This kind of automation is non-negotiable if you want to scale your support. We know from experience that efficient ticket management has a direct line to customer satisfaction, and triggers are a huge part of that.
Connecting Your Form to External Systems
Your ticket form data doesn't have to stay locked inside Zendesk. You can push it out to other essential tools like your CRM, project management software, or even a custom database. This creates a single, unified view of the customer and breaks down the information silos that often pop up between departments.
Many businesses use third-party connectors or build out custom integrations with APIs to get this done. You could, for instance, create a two-way sync between Zendesk and another platform. This keeps everything in lockstep, ensuring that an update in one system is automatically reflected in the other. It’s all about maintaining a single source of truth for every customer interaction.
A Practical Integration Example with CallCow
Let's walk through a specific use case with an AI voice agent like CallCow. Imagine a real estate brokerage uses CallCow to field after-hours maintenance calls. The AI agent gathers the initial details and logs a ticket in Zendesk.
To make this handoff seamless, you can map the information CallCow gathers directly to the specific fields on your "Maintenance Request" ticket form.
- CallCow AI: "Can you please provide the property address?"
- Action: This response automatically populates the
Property Addresscustom field in the Zendesk ticket.
- Action: This response automatically populates the
- CallCow AI: "Is this an emergency, like a burst pipe or fire?"
- Action: If the caller says "yes," it ticks a custom checkbox labeled
Emergency. This, in turn, can fire off a trigger that immediately notifies the on-call property manager.
- Action: If the caller says "yes," it ticks a custom checkbox labeled
This integration means that when an agent opens the ticket, they aren't just reading a raw call transcript. They're looking at a perfectly structured Zendesk ticket, created from your form, with all the necessary fields already filled out. They can assess the situation and dispatch help in seconds.
By connecting an external tool like CallCow directly to your ticket form in Zendesk, you completely automate the data entry process. This saves an incredible amount of time and cuts down on the risk of human error. This is how you build a truly connected and efficient support ecosystem.
Putting Theory Into Practice: Ticket Form Examples for Different Industries
It's one thing to talk about ticket forms in the abstract, but it’s much more helpful to see them in action. A generic, one-size-fits-all form will only get you so far. To get the specific data you need, you have to tailor the form to the unique language and problems of your industry. When you do this right, the quality of information you collect skyrockets.
Let's walk through three common scenarios. I’ll show you not just what fields to include, but the strategic thinking behind each one.
The SaaS Company Bug Report Form
If you work at a software company, you know that clear bug reports are pure gold. Vague complaints like "it's not working" are a developer's nightmare. A well-designed form essentially forces users to provide the crucial context your engineering team needs to replicate and fix the problem fast.
Here’s a blueprint for a bug report form that actually works:
- Product Area (Required Dropdown): Include options like 'Dashboard,' 'Reporting,' or 'User Authentication.' This is your first line of defense, sorting the ticket directly to the right product squad from the get-go.
- Browser Version (Text Field): Absolutely critical for any front-end issue. So many bugs are browser-specific, and getting this detail upfront saves a ton of back-and-forth.
- Operating System (Dropdown): Offer choices like 'Windows 11,' 'macOS Sonoma,' and 'Linux.' Just like the browser, this is essential for replicating issues tied to a specific environment.
- Steps to Reproduce (Required Text Area): This is the most important field on the form. I always recommend using placeholder text to guide the user, like, "Please list the exact steps you took, starting from when you logged in."
- Expected vs. Actual Behavior (Text Area): This field helps clarify the user's intent. A statement like, "I expected X to happen, but Y happened instead," is incredibly useful for a developer.
- Screenshot/Recording Upload (File Upload): A visual is often worth a thousand words. You can make this optional, but it's always a good idea to strongly encourage it.
This kind of specific setup transforms a frustrating customer complaint into a well-defined, actionable task for your dev team.
The E-commerce Return Request Form
In e-commerce, returns are just part of the business. Your goal should be to make the process as painless as possible for the customer while gathering valuable data for yourself. This is your chance to flag product quality issues or spot misleading descriptions on your site.
A solid return form should include these fields:
- Order Number (Required Text Field): This is the key identifier. With the order number, your agent can instantly pull up the entire transaction history without another email.
- Item(s) to Return (Checkbox List - Dynamic): If you can, use a Zendesk integration to automatically pull in the items from the customer's order. This lets them simply check off what they're sending back.
- Reason for Return (Required Dropdown): This field is your data goldmine.
- 'Item arrived damaged'
- 'Wrong item received'
- 'Doesn't fit as expected'
- 'No longer needed'
- Preferred Resolution (Dropdown): Give customers options like 'Refund,' 'Store Credit,' or 'Exchange for a different size.' Offering choices can often help you retain the sale.
By structuring your return form this way, you turn a potential negative experience into a smooth, self-service process. You also get clean, reportable data on return reasons that your merchandising team can use to make smarter decisions.
The Real Estate Maintenance Request Form
For property managers and real estate agencies, maintenance requests never stop. The challenge is to quickly tell the difference between a leaky faucet and a burst pipe. A smart ticket form in Zendesk can do that initial triage for you.
Here are the essential fields to consider:
- Property Address (Required Dropdown/Text): If you manage multiple properties, a dropdown is the way to go. This is non-negotiable for routing the request to the right person.
- Issue Urgency (Required Dropdown): This is your most critical sorting tool.
- 'Emergency (Fire, Flood, Gas Leak)'
- 'High (No Hot Water, Clogged Toilet)'
- 'Standard (Leaky Faucet, Appliance Repair)'
- Permission to Enter (Checkbox): A simple checkbox that says, "I give permission for maintenance staff to enter my unit if I am not home," can prevent days of scheduling delays.
- Detailed Description of Issue (Required Text Area): Prompt for specifics. Ask for the exact location, like "kitchen sink" or "master bathroom shower."
The global reach of platforms like Zendesk, which once saw web visits peak at 90.04 million in a single month, shows just how embedded these digital workflows have become. With the United States driving 36.56% of its traffic, it's clear that businesses in major markets rely heavily on these tools to manage operations like property maintenance. You can dig deeper into these trends and see how Zendesk's solutions are used worldwide by reviewing the latest statistics.
Keeping Your Forms in Top Shape: Performance and Troubleshooting
Getting your new ticket form live is a great first step, but it’s definitely not the last. Now the real work begins: seeing how it performs in the wild and fixing the inevitable hiccups that pop up. The whole point is to turn raw data into smart improvements for your ticket form in Zendesk.
Your best friend here is going to be Zendesk Explore, the platform’s built-in analytics tool. This is where you can see exactly what's happening with ticket volume, resolution times, and agent activity. I always tell people to start by looking at metrics like resolution time for each specific form or how many times an agent has to touch a ticket before it's solved.
For example, a common pain point is first-reply time. Industry data often shows that around 12% of tickets take over 24 hours to get an initial response—that's a perfect target for improvement. You can learn how to dig into your own support activity and agent performance to find these kinds of insights.
Think of it this way: if you notice that every ticket coming through your "Billing Inquiry" form gets bounced between three different agents, that’s not an agent problem. It’s a form problem. It tells you loud and clear that the fields or options are confusing and need a rethink.
Tackling Common Form Problems
No matter how carefully you build them, forms can be finicky. Here are a couple of the most common issues I see and how to get them sorted out fast.
Conditional Fields Aren't Showing Up
This is, without a doubt, the number one issue people run into. A field is supposed to appear when a user selects a certain option, but... nothing happens.
Nine times out of ten, the logic is just slightly off. You need to go back and double-check your conditions. Make sure the controlling field (the one the user picks from) is correctly linked to the dependent field (the one that's supposed to appear). It’s also easy to accidentally create a conflicting rule somewhere else that’s overriding what you want to happen. Be methodical and trace the logic step-by-step.
Customers Can't See the Form
You’ve built the perfect form, but your customers can't even find it. This is almost always a simple permissions setting.
- Head over to Settings > People > Configuration > End users.
- Look for the setting that says "Can see and edit their own tickets" and make sure it’s checked.
- It's also worth double-checking the form's individual settings. You need to confirm it’s marked as "active" and available for end-users, not just internal agents.
A form you don't track is just a shot in the dark. By regularly checking your performance data and being ready to fix small issues, you ensure your forms are actually doing their job: making life easier for your agents and your customers.
Common Questions and Quick Answers
Let's tackle some of the most common questions that pop up when you're deep in the weeds of setting up Zendesk ticket forms. These are the little details that can sometimes trip you up, but the solutions are usually straightforward.
Can I Have Different Forms for Different Brands?
Yes, you absolutely can, and you should! If you’re juggling multiple brands within one Zendesk account, giving each brand its own unique ticket form in Zendesk is a smart move. It helps you customize the experience—from the specific fields you show to the language and branding—making sure customers get a consistent and relevant interaction every time.
How Many Ticket Forms Can I Actually Create?
This one comes down to your Zendesk subscription plan. The higher-tier plans, like Enterprise, will give you a lot more room to create forms than the starter plans.
It's always worth double-checking the specifics of your plan, but most offer more than enough flexibility to set up dedicated forms for your main workflows, like sales inquiries, technical issues, or billing questions.
Why Aren't My Custom Fields Showing Up?
This is probably the most frequent snag people hit. You've created a brilliant custom field, but it's nowhere to be seen on the form your customers use. Nine times out of ten, it’s one of two things.
- Is it agent-only? A custom field might be set to be visible only to your internal team. Dive into the field’s settings and make sure it’s configured to be visible and editable by end-users.
- Did you add it to the form? Just creating a custom field doesn't automatically place it on any of your forms. You have to go into the specific ticket form and drag it into place. It’s an easy step to forget.
My Go-To Trick: Always, always test your forms in an incognito browser window before you go live. This lets you see the form exactly as a customer would, so you can catch any missing fields or other weirdness before it causes any headaches.
Getting your forms right is the first step to building a support system that actually works for you, not against you.
Ready to stop juggling inbound calls and start automating them? With CallCow, you can launch an AI voice agent in minutes. It can handle calls, book appointments, and create perfectly detailed tickets right in your support system. See how it works at https://callcow.ai.