How to automate AI phone answering with webhooks
Automate post-call workflows with CallCow webhooks. JSON payload reference, Node.js and Python receiver examples, and common automations for CRM sync and Slack notifications.How to automate AI phone answering with webhooks
An AI phone answering service handles inbound calls for your business around the clock. The problem most teams hit is what happens after the call ends. Call transcripts, caller details, and form submissions sit inside the AI platform instead of flowing into your CRM, spreadsheets, or team chat. Webhooks solve this by pushing a structured data payload to your server every time a call finishes, so you can build automated post-call workflows without manual data entry or API polling.
If you have already set up your AI phone answering service and want to connect it to the rest of your stack, this guide walks through the full webhook setup. The webhooks documentation covers the configuration details. Below I cover the payload structure, receiver code in Node.js and Python, and common automations including CRM sync, Slack alerts, and Google Sheets logging.
If you are evaluating vendors, this is the feature to test before you buy. A phone answering tool is only useful if one completed call can reliably create the CRM record, Slack alert, or spreadsheet row your team actually uses. With CallCow, you can validate that quickly with a browser call, one webhook URL, and one workflow.
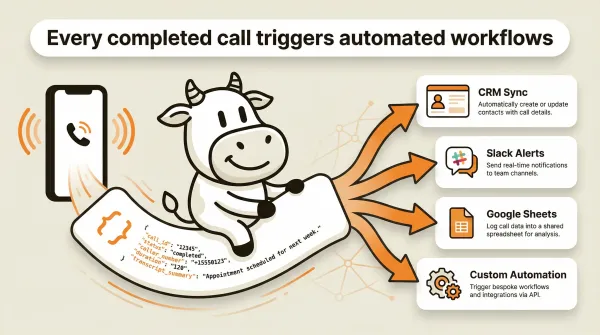
Table of contents
- What CallCow webhooks do
- The webhook payload structure
- Step-by-step webhook setup
- Common post-call automations
- Pros and cons of webhook-based automation
- Who this is for (and who it's not)
- Frequently asked questions
What CallCow webhooks do
CallCow sends a single HTTP POST request to a URL you provide each time an AI phone call completes. The payload is a JSON object that includes the call ID, the workflow that handled it, a call summary, the full conversation transcript, any form data the caller filled out, and the original context you passed in when triggering the call.
The webhook fires on call completion. It does not stream data in real time while the call is active. This is an important distinction if you are building dashboards that need live call state. The documentation describes completion webhooks, not a live event stream, so plan this integration as a post-call pipeline rather than an in-call monitoring system.
Webhooks are configured in the Integration tab inside CallCow. You paste your endpoint URL, save it, and attach it to a workflow. After that, every call handled by that workflow triggers a POST to your server when it finishes.
This approach has clear benefits over polling for finished-call data yourself. It is event-driven, so your server receives data when the call ends with no need to run cron jobs against the API. The payload includes the main post-call fields in one request: transcript, summary, form fills, and metadata. It works with any HTTP server, so you can use Express, Flask, FastAPI, Cloudflare Workers, or serverless functions on AWS Lambda and Google Cloud Functions. CallCow also uses a BYOC Twilio model, which means you keep your telephony setup in your own Twilio account while routing webhook data into your own systems.
One practical note: the quality of the transcript, summary, and form fills in your webhook payload depends on the LLM model your workflow uses. We recommend GPT 5.4 for production workflows that feed into CRMs or automated pipelines. It produces fewer hallucinations in our testing, which matters when webhook data triggers downstream actions. There is a slight latency increase, but the accuracy improvement is worth it when call data drives real business workflows. Select it per-workflow in LLM Models settings.
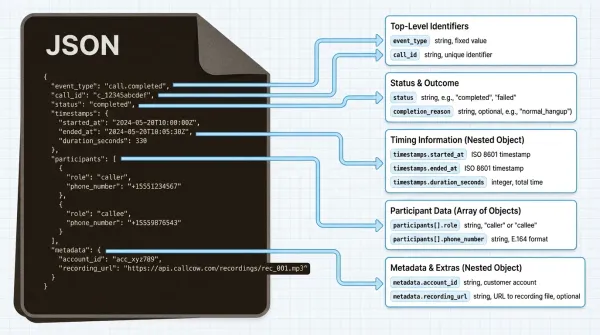
The webhook payload structure
The full JSON payload CallCow sends on call completion looks like this:
{
  "call_id": "e0f4c895-e3ea-416a-a98a-578e82868473",
  "workflow_id": "008bda4d-b467-4f55-a8ed-803b3d1d69d5",
  "workflow_name": "calendly test (Copy)",
  "phone_number_from": "browser",
  "phone_number_to": "browser",
  "call_status": "not_picked_up",
  "call_summary": "User and assistant exchange greetings, with assistant introducing themselves as Alex.",
  "messages": [
    {
      "role": "user",
      "content": "Hi"
    },
    {
      "role": "assistant",
      "content": "Hello. Thank you for answering. My name is Alex."
    },
    {
      "role": "user",
      "content": "Hello?"
    },
    {
      "role": "assistant",
      "content": "Yes yes"
    }
  ],
  "context": "{\"name\": \"YiMing HAN\", \"email\": \"hanyiming1995@gmail.com\", \"number\": \"+14165551234\"}",
  "form_fills": [
    {
      "title": "Lead Capture Form",
      "values": {
        "Email": "caller@example.com",
        "Phone Number": "+14165559876",
        "Service Type": "Consultation"
      }
    }
  ],
  "created_at": "2026-01-30T14:48:36.371886"
}
Field reference
| Field | Type | Description |
|---|---|---|
call_id | string | Unique identifier for the call |
workflow_id | string | ID of the workflow that handled the call |
workflow_name | string | Human-readable name of the workflow |
phone_number_from | string | Originating number, or browser for web calls |
phone_number_to | string | Destination number, or browser for web calls |
call_status | string | success or not_picked_up |
call_summary | string | AI-generated summary of the conversation |
messages | array | Full transcript with role and content per message |
context | string | JSON-encoded string of custom context passed to the workflow |
form_fills | array | Forms filled during the call. Each entry has title and values |
created_at | string | ISO 8601 timestamp of call creation |
A few details worth noting. The context field is a JSON string, not a parsed object. You need to run JSON.parse() on it before accessing the values. The documentation shows form_fills as part of the payload shape and documents forms as a webhook-supported feature when your workflow includes forms. In your receiver, still code defensively for empty arrays or missing values. The call_status field in the documented example uses success when the call connected and not_picked_up when the caller did not answer.
The messages array gives you the complete back-and-forth transcript. Each object has a role of either user or assistant and a content string. This is useful if you want to run sentiment analysis, search for specific keywords mentioned during the call, or feed the transcript into a downstream LLM for further processing.
Try it: start a free CallCow trial and send your first webhook in under 5 minutes.
Why forms make webhooks more valuable: CallCow's Forms feature (6 field types, text, number, email, phone, select, multi-select) turns phone calls into structured CRM data. The form_fills field in the webhook payload is the bridge between a voice conversation and your database. Read the forms guide.
Step-by-step webhook setup
Step 1: Configure the webhook URL in CallCow
Log into your CallCow dashboard and navigate to the Integration tab. Paste the URL of your webhook receiver endpoint. Save the configuration.
After saving, edit the workflow you want to attach the webhook to and update its metadata to reference the webhook. CallCow docs cover the exact workflow-linking steps in the webhooks documentation.
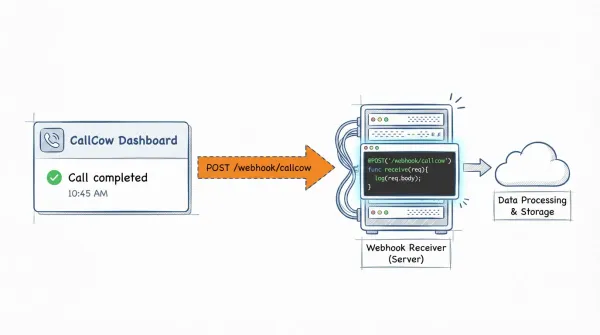
Step 2: Build a receiver endpoint
Your endpoint needs to accept POST requests with a JSON body and return a 2xx status code. Here are implementations in Node.js and Python.
Node.js (Express)
const express = require("express");
const app = express();

app.use(express.json());

app.post("/webhook/callcow", (req, res) => {
  const payload = req.body;

  console.log("Call completed:", payload.call_id);
  console.log("Status:", payload.call_status);
  console.log("Summary:", payload.call_summary);

  const context = JSON.parse(payload.context);
  console.log("Caller:", context.name);
  console.log("Email:", context.email);

  if (payload.form_fills && payload.form_fills.length > 0) {
    payload.form_fills.forEach((form) => {
      console.log("Form:", form.title);
      console.log("Values:", form.values);
    });
  }

  res.status(200).send("OK");
});

app.listen(3000, () => {
  console.log("Webhook receiver running on port 3000");
});
Python (Flask)
from flask import Flask, request, jsonify
import json

app = Flask(__name__)

@app.route('/webhook/callcow', methods=['POST'])
def handle_webhook():
    payload = request.get_json()

    print(f"Call completed: {payload['call_id']}")
    print(f"Status: {payload['call_status']}")
    print(f"Summary: {payload['call_summary']}")

    context = json.loads(payload['context'])
    print(f"Caller: {context.get('name')}")
    print(f"Email: {context.get('email')}")

    form_fills = payload.get('form_fills', [])
    for form in form_fills:
        print(f"Form: {form['title']}")
        print(f"Values: {form['values']}")

    return 'OK', 200

if __name__ == '__main__':
    app.run(port=3000)
Both examples do the same thing. They parse the incoming JSON, log the key fields, and return a 200 response. In production you would replace the console logging with whatever downstream action you need: writing to a database, calling a CRM API, posting to Slack, or appending a row to a spreadsheet.
Step 3: Expose your local server for testing
If you are developing locally, use a tunneling tool like ngrok to expose your local port to the internet. CallCow needs a publicly reachable URL to send the POST request.
ngrok http 3000
Copy the ngrok HTTPS URL and paste it into the CallCow Integration tab. Any call that completes on the linked workflow will now POST to your local machine.
Step 4: Test with a browser call
CallCow webhooks work on browser calls. You do not need a real phone number to test. Open a workflow in the CallCow dashboard, start a browser call, say a few things, and end the call. Check your terminal. You should see the webhook payload logged within seconds of the call ending.
This is the fastest way to verify your receiver works before deploying it to production or connecting real phone numbers.
Step 5: Parse the payload and handle edge cases
When building production receivers, handle these scenarios:
Duplicate deliveries. Use the call_id field as an idempotency key. Store each call_id you process and skip any duplicates. CallCow does not document retry behavior, but idempotency is still the safe default for any webhook receiver.
Missing fields. Not every payload includes form_fills. Check that the array exists and has length before iterating. The context field might be an empty string if no context was passed when the call was triggered.
Non-success statuses. Calls with call_status of not_picked_up still trigger the webhook. Decide whether you want to process these or ignore them. You might want to log missed calls separately for follow-up.
Security assumptions. CallCow's docs do not currently document webhook signature verification. Treat the endpoint as unauthenticated unless you add your own controls, such as IP filtering, a secret path, or an application-level token.
Async processing. Return the 200 response immediately and process the payload in a background queue. That keeps your endpoint responsive even when downstream CRM or database writes are slow.
A more robust Node.js example with idempotency and async processing:
const processedCalls = new Set();

app.post("/webhook/callcow", async (req, res) => {
  const { call_id, call_status, form_fills, context } = req.body;

  if (processedCalls.has(call_id)) {
    return res.status(200).send("Duplicate");
  }
  processedCalls.add(call_id);

  res.status(200).send("OK");

  if (call_status !== "success") {
    console.log(`Skipping non-success call: ${call_id}`);
    return;
  }

  const ctx = JSON.parse(context || "{}");

  if (form_fills && form_fills.length > 0) {
    for (const form of form_fills) {
      await syncToCRM(form.values, ctx);
    }
  }

  await logCallToDatabase(req.body);
});
Common post-call automations
Once your receiver is running and parsing payloads correctly, you can wire up downstream automations. Here are the most useful ones for teams using an AI phone answering service.
One completed test call landing cleanly in HubSpot, Salesforce, Slack, or Google Sheets without manual cleanup is what proves the AI answering layer fits your real workflow instead of becoming another dashboard your team ignores. During calls, the AI can also text callers links, booking URLs, or payment links via SMS Instructions, useful for payment or scheduling workflows. HubSpot and Salesforce in this section are custom webhook examples, not documented native CallCow integrations.
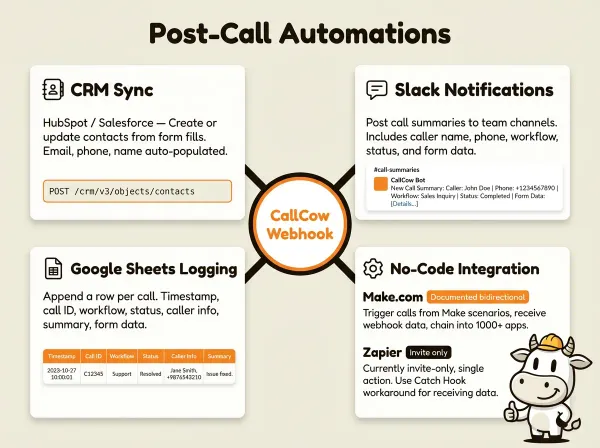
CRM sync: HubSpot
Use the form fills from the webhook payload to create or update contacts in HubSpot.
async function syncToHubSpot(formValues, context) {
  const response = await fetch(
    "https://api.hubapi.com/crm/v3/objects/contacts",
    {
      method: "POST",
      headers: {
        Authorization: `Bearer ${process.env.HUBSPOT_ACCESS_TOKEN}`,
        "Content-Type": "application/json",
      },
      body: JSON.stringify({
        properties: {
          email: formValues.Email || context.email || "",
          phone: formValues["Phone Number"] || context.number || "",
          firstname: context.name ? context.name.split(" ")[0] : "",
          lastname: context.name
            ? context.name.split(" ").slice(1).join(" ")
            : "",
        },
      }),
    },
  );

  const data = await response.json();
  console.log("HubSpot contact created:", data.id);
}
This creates a new contact in HubSpot each time a call completes with form data. If you want to update existing contacts instead of creating duplicates, use HubSpot's search API to look up contacts by email or phone number first, then update the matching record.
CRM sync: Salesforce
Salesforce works the same way. POST to the REST API with the contact fields from the webhook payload.
async function syncToSalesforce(formValues, context) {
  const response = await fetch(
    `${process.env.SF_INSTANCE_URL}/services/data/v58.0/sobjects/Contact`,
    {
      method: "POST",
      headers: {
        Authorization: `Bearer ${process.env.SF_ACCESS_TOKEN}`,
        "Content-Type": "application/json",
      },
      body: JSON.stringify({
        Email: formValues.Email || context.email || "",
        Phone: formValues["Phone Number"] || context.number || "",
        FirstName: context.name ? context.name.split(" ")[0] : "",
        LastName: context.name
          ? context.name.split(" ").slice(1).join(" ")
          : "",
      }),
    },
  );

  const data = await response.json();
  console.log("Salesforce contact created:", data.id);
}
Slack notifications
Post a summary to a Slack channel when a call completes. This keeps your team informed without anyone having to check the CallCow dashboard.
async function postToSlack(payload) {
  const ctx = JSON.parse(payload.context || "{}");
  const formInfo =
    payload.form_fills && payload.form_fills.length > 0
      ? payload.form_fills
          .map((f) => `*${f.title}*: ${JSON.stringify(f.values)}`)
          .join("\n")
      : "No forms submitted";

  const message = {
    channel: "#call-alerts",
    text: `New call completed`,
    blocks: [
      {
        type: "section",
        text: {
          type: "mrkdwn",
          text: `*Call completed* (${payload.call_status})`,
        },
      },
      {
        type: "section",
        fields: [
          { type: "mrkdwn", text: `*Caller:*\n${ctx.name || "Unknown"}` },
          {
            type: "mrkdwn",
            text: `*Phone:*\n${ctx.number || payload.phone_number_from}`,
          },
          { type: "mrkdwn", text: `*Workflow:*\n${payload.workflow_name}` },
          { type: "mrkdwn", text: `*Status:*\n${payload.call_status}` },
        ],
      },
      {
        type: "section",
        text: {
          type: "mrkdwn",
          text: `*Summary:*\n${payload.call_summary}`,
        },
      },
      {
        type: "section",
        text: {
          type: "mrkdwn",
          text: `*Form data:*\n${formInfo}`,
        },
      },
    ],
  };

  await fetch("https://slack.com/api/chat.postMessage", {
    method: "POST",
    headers: {
      Authorization: `Bearer ${process.env.SLACK_BOT_TOKEN}`,
      "Content-Type": "application/json",
    },
    body: JSON.stringify(message),
  });
}
This posts a structured Slack message with the caller name, phone number, workflow name, call status, summary, and any form data. Your sales or support team sees every completed call in the channel without logging into CallCow.
Google Sheets logging
Append a row to a Google Sheet for every completed call. This gives you a simple, searchable log of all AI phone interactions.
const { google } = require("googleapis");

async function logToGoogleSheets(payload) {
  const auth = new google.auth.GoogleAuth({
    keyFile: "credentials.json",
    scopes: ["https://www.googleapis.com/auth/spreadsheets"],
  });

  const sheets = google.sheets({ version: "v4", auth });
  const ctx = JSON.parse(payload.context || "{}");

  const row = [
    payload.created_at,
    payload.call_id,
    payload.workflow_name,
    payload.call_status,
    ctx.name || "",
    ctx.email || "",
    ctx.number || "",
    payload.call_summary,
    payload.form_fills ? JSON.stringify(payload.form_fills) : "",
  ];

  await sheets.spreadsheets.values.append({
    spreadsheetId: process.env.GOOGLE_SHEET_ID,
    range: "Calls!A:I",
    valueInputOption: "USER_ENTERED",
    requestBody: { values: [row] },
  });
}
Set up a Google Cloud service account, share your spreadsheet with the service account email, and store the credentials file on your server. Each webhook triggers a new row with the timestamp, call ID, workflow, status, caller info, summary, and form data.
Make.com integration
If you prefer no-code workflows, CallCow has a documented integration with Make.com. The setup works in two directions. You can trigger calls from Make scenarios using the HTTP module with CallCow's REST API, and you can receive webhook data from CallCow into Make to chain it into any of Make's supported apps.
The webhook receiver pattern is the same. You configure CallCow to POST to a Make webhook URL, and Make parses the JSON payload and passes the fields into downstream modules: create a HubSpot deal, send an email, update a row in Airtable, or trigger any other automation.
Monday.com integration
If your team runs intake through Monday.com, CallCow has a documented Monday.com integration. The native guide focuses on triggering calls from new board rows and writing call outcomes back, but it also gives you a concrete path for teams already operating in boards instead of a traditional CRM.
Zapier integration
CallCow offers a Zapier integration, but it is currently invite-only and limited to a single action (creating a workflow to trigger calls). If you need to receive webhook data into Zapier rather than trigger calls from Zapier, use Zapier's built-in webhook trigger (Catch Hook) and configure CallCow to POST to the Zapier webhook URL. This workaround works but is not a native CallCow Zapier trigger.
Pros and cons of webhook-based automation
Pros
- Event-driven: data arrives the moment a call ends, no polling required
- Full payload in one request: transcript, summary, form fills, and metadata
- Works with any HTTP server and any downstream tool you already use
- No vendor lock-in on the data side since you control the endpoint
Cons
- Requires a developer or a no-code tool like Make.com to set up the receiver
- Webhooks fire on completion only, no real-time call state monitoring
- CallCow does not document retry logic for failed webhook deliveries
- You are responsible for endpoint uptime and idempotency handling
- The payload includes the text transcript but not the audio recording
Frequently asked questions
Does the webhook fire while the call is still in progress?
No. CallCow webhooks fire on call completion only. You receive the POST request after the call has ended.
What happens if my webhook endpoint is down?
CallCow does not document retry logic for failed webhook deliveries. Build your receiver with reliability in mind. Use a serverless function on a platform with high uptime, and consider logging failed calls in CallCow so you can reconcile gaps later.
Can I use webhooks with the agent calling API?
Yes. The agent calling API lets external AI agents trigger phone calls through CallCow. When those calls complete, the same webhook fires with the same payload structure. This means whether a call starts from the CallCow dashboard, the REST API, or an external agent via the prompt-to-call endpoint, your webhook receiver handles it identically.
How do I handle duplicate webhook deliveries?
Store the call_id from each payload in a database or in-memory set. Before processing a new payload, check whether you have already seen that call_id. If it exists, skip processing and return 200. This idempotency pattern prevents duplicate CRM entries or duplicate spreadsheet rows.
Do webhooks include audio recordings?
No. The documented webhook payload includes the text transcript (messages array) and a text summary (call_summary), but not an audio file.
Can I attach multiple webhooks to one workflow?
CallCow's current documentation describes a single webhook URL per configuration. If you need to send call data to multiple endpoints, build a dispatcher in your receiver that fans out the payload to each downstream service.
Who this is for (and who it's not)
Webhook automation is not for everyone. Here is who benefits most and who should look elsewhere.
Good fit:
- Developers building internal tools. If you have a CRM, a custom dashboard, or an internal API, webhooks are the fastest way to get call data flowing into your existing stack. You write a small receiver, deploy it, and every completed call populates your systems automatically.
- Teams already using Make.com, n8n, or generic webhook tools. You do not need to write code. Configure CallCow to POST to your automation platform, and chain the data into HubSpot, Slack, Google Sheets, or whatever else you use. Make.com has a documented bidirectional integration with CallCow. Zapier can still be used through webhook catches, but CallCow's native Zapier app is invite-only and limited.
- Operations-heavy businesses. Field service companies, real estate brokerages, medical offices, and SaaS teams that need call data in their pipeline tools without manual entry. If your team currently copies data from a call log into a CRM, webhooks eliminate that step entirely.
- Teams running outbound call campaigns. When you use the Agent Calling API or list calling to reach prospects at scale, webhooks deliver the results of every call to your systems so your sales or support team can act on them immediately.
Not a good fit:
- Non-technical solo operators. If you do not have a developer on staff and do not use no-code tools like Make.com, setting up a webhook receiver is a barrier. You would need to hire someone or use a simpler integration method. If webhooks sound like too much, CallCow's dashboard and inbound contacts feature handle call logging without any code, read the setup guide.
- Anyone who needs real-time call monitoring. CallCow webhooks fire on completion only. If you need to see data as the call progresses (live dashboards, mid-call interventions, real-time dispatch), documented webhooks are the wrong tool.
- Teams that need audio recordings in their pipeline. The documented webhook payload includes the text transcript and summary, not an audio file.
- High-reliability environments without retry handling. CallCow does not document retry logic for failed webhook deliveries. If your endpoint goes down, you may miss payloads. Build your receiver with idempotency (using
call_idas a dedup key) and consider logging missed calls separately for reconciliation.
If you are evaluating an AI phone answering service, webhooks are the feature that determines whether the platform fits into your existing stack or becomes another siloed tool. CallCow's documented webhook payload includes call metadata, full transcripts, context, and form fills in a single POST request, which is enough to test most post-call automations without extra polling.
The practical next step is to connect one webhook endpoint and run a browser call against the workflow you would actually use in production. Make it create the CRM record, Slack alert, or spreadsheet row your team needs. If that passes, move your missed calls into the same pipeline with CallCow's voicemail forwarding setup so unanswered calls land in a system your team can act on.
About the author: Yiming Han is the founder of CallCow and writes about phone automation, missed calls, and the tradeoffs that show up when small businesses actually deploy voice AI.