How to set up AI receptionist calendar integration
Connect your AI receptionist with Google Calendar, Cal.com, Calendly, TidyCal, and Trafft. Setup steps, limitations, and custom webhook options.How to set up AI receptionist calendar integration
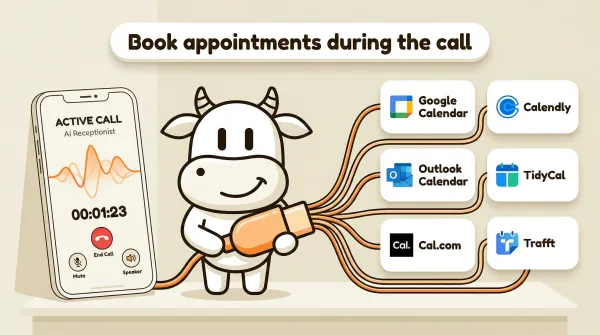
An AI receptionist calendar integration connects your phone answering agent directly to your scheduling tool. When a caller requests an appointment, the AI checks your real-time availability, books a time slot, and confirms the details during the same phone call.
If you are evaluating whether this is worth implementing, the practical question is simple: can your business turn more inbound calls into confirmed appointments without adding front-desk labor or forcing callers into a follow-up workflow. If appointments drive revenue for your business, real-time phone booking is usually easier to justify than another missed-call recovery process.
Table of contents
- How AI calendar integration works
- Before you start
- Google Calendar setup (beta)
- Cal.com setup
- Calendly setup
- TidyCal setup
- Trafft setup
- Calendar comparison table
- Custom webhook for unsupported calendars
- Pros and cons of AI calendar integration
- FAQ
How AI calendar integration works
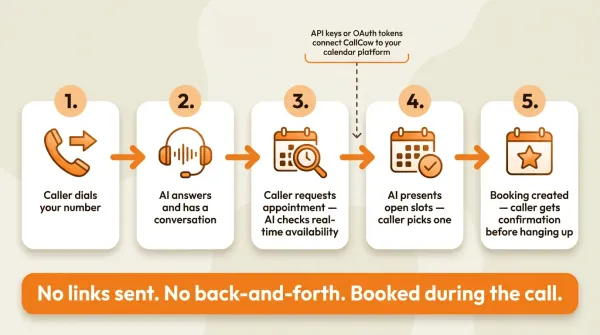
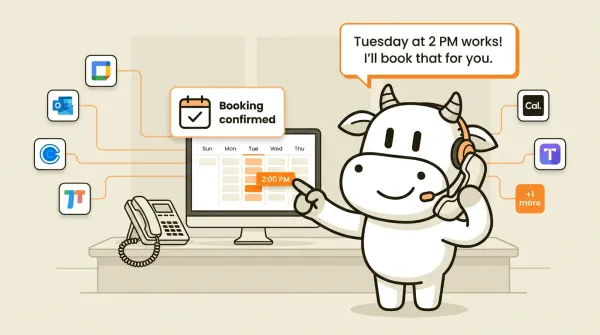
The flow is straightforward. A caller dials your business number. Your AI receptionist answers the call and has a conversation. When the caller asks for an appointment, the AI checks your connected calendar for open slots. It presents options, the caller picks one, and the AI creates the booking in your calendar. The caller gets a confirmation before hanging up.
Sending a scheduling link mid-call doesn't work. Link-based tools like Calendly work well on websites and in emails. But on a phone call, you cannot send a link and expect the caller to click it while talking. The AI handles the entire booking conversationally, in real time.
There is an exception for links the caller actually needs. If your workflow uses SMS Instructions, the AI agent can text the caller a booking confirmation, directions to your office, or a payment link directly to their phone mid-conversation. SMS links shine when the information is easier to share as a clickable link than as something the caller has to write down. It requires Twilio SMS capability on your account (part of the BYOC setup).
The integration uses API keys or OAuth tokens that you provide once during setup. After that, CallCow communicates with your calendar platform directly. Your AI phone answering service reads availability and writes bookings without any manual involvement.
CallCow supports two categories of calendar connections. Native calendar integrations cover Google Calendar and Outlook Calendar. These work through OAuth, meaning the AI reads your availability directly from your calendar app. Third-party scheduling integrations cover Cal.com, Calendly, TidyCal, and Trafft. These work through API keys and connect to dedicated scheduling platforms.
Both approaches achieve the same result. The AI books appointments on your behalf during live calls.
Webhooks fire on call completion, not during the call. This means your calendar booking happens as part of the active call flow, but any downstream notifications (like sending data to a CRM or triggering follow-up workflows) happen after the call ends. This is covered in more detail in the webhook automation guide.
Before you start
You need three things before connecting a calendar to your AI receptionist.
First, a CallCow account with a working phone number. If you have not set this up yet, the AI phone answering setup guide covers the full process including Twilio configuration.
Second, a calendar or scheduling tool account. Each integration section below specifies which account type you need and what credentials are required.
Third, a workflow that includes appointment booking. Your AI agent needs instructions on when to offer bookings and how to handle the scheduling conversation. You can set this up in the CallCow workflow builder.
You'll need a Twilio account, CallCow uses a bring-your-own-carrier model where you manage your own telephony billing.
A few things to be aware of upfront:
- The AI always identifies itself as AI, callers will know they're talking to a machine.
- Production calling is capped at 60 requests per minute.
- Trial accounts are limited to 4 concurrent calls with verified numbers only.
One practical note on model selection. For scheduling workflows where accuracy on dates, times, and availability matters, we recommend selecting GPT 5.4 as the LLM model. It produces fewer hallucinations in our testing. There is a slight latency increase compared to earlier models, but for appointment booking the accuracy tradeoff is worth it. You can set the model per-workflow in LLM Models settings.
From a buying perspective, there are really two implementation paths. If your team already lives in Google Calendar or Outlook Calendar, the native beta integrations are the cleanest option because there is no extra scheduling layer to manage. If your team already runs bookings through Cal.com, Calendly, TidyCal, or Trafft, the better decision is usually to keep that existing scheduling system and let CallCow book into it during the call.
If you want to test it on your own number, CallCow has a trial at callcow.ai.
Google Calendar setup
Google Calendar is a native integration in CallCow, currently in beta. It connects through Google OAuth, so the AI reads your availability directly from your Google Calendar without a separate scheduling platform.
To set up Google Calendar:
- Open your CallCow dashboard and go to the Integrations tab.
- Select Google Calendar from the available integrations.
- Click the connect button. You will be redirected to a Google OAuth consent screen.
- Sign in with the Google account that holds your business calendar.
- Grant the requested permissions for calendar read and write access.
- Return to CallCow. The connection status should show as active.
Because this is a beta feature, the setup process may change. The OAuth flow means you never share a password or API key. If you need to disconnect, remove the integration from your CallCow dashboard and revoke access in your Google account settings under Security > Third-party apps with account access.
Google Calendar works well if you manage your availability directly in Google Calendar and do not use a separate scheduling tool. It eliminates the middle layer between your calendar and your AI agent.
Microsoft Outlook Calendar follows the same OAuth-based pattern. The setup steps mirror Google Calendar but use Microsoft OAuth. Both are native scheduling assistant integrations in beta, serving the same purpose for businesses that prefer one calendar ecosystem over the other.
Cal.com setup
Cal.com is an open-source scheduling platform. The integration uses an API key that allows CallCow to create bookings on your behalf.
Step 1. Go to app.cal.com and log in to your account.
Step 2. Navigate to Settings in the sidebar.
Step 3. Click on API Keys in the settings menu.
Step 4. Click Create New API Key.
Step 5. Set the expiration to Never. This is important. If the key has an expiration date, it will stop working and your AI receptionist will not be able to book appointments. Double-check that the expiration field shows "Never" before proceeding.
Step 6. Copy the API key.
Step 7. Open your CallCow dashboard and go to the Integrations tab.
Step 8. Select Cal.com and paste the API key.
Step 9. Save the integration.
After saving, your AI agent can check availability and create bookings through Cal.com during phone calls.
To disconnect, remove the integration from CallCow and delete the API key from your Cal.com settings page. There is no way for CallCow to access your Cal.com account after the key is removed.
The API key approach is straightforward but worth understanding from a security perspective. The key acts as a credential. Anyone with the key can create bookings on your Cal.com account. Keep it stored only in CallCow and your Cal.com settings. If you suspect the key has been compromised, regenerate it immediately in Cal.com and update the CallCow integration with the new key.
Calendly setup
Calendly is the most widely used scheduling platform for businesses. The CallCow integration uses a personal access token.
Step 1. Go to calendly.com/integrations and log in.
Step 2. Search for "API" in the integrations directory.
Step 3. Select "API and webhooks" from the results.
Step 4. Click Generate New Token.
Step 5. Give the token a descriptive name, like "CallCow Integration."
Step 6. Calendly will generate a personal access token. Copy it immediately. You will not be able to see it again after leaving the page.
Step 7. Open your CallCow dashboard and go to the Integrations tab.
Step 8. Select Calendly and paste the personal access token.
Step 9. Save the integration.
A limitation to be aware of. The Calendly personal access token is tied to a single user account, not an organization. If your business uses a Calendly organization with multiple team members, the token only accesses the account of the person who generated it. There is no organization-level token available.
Also, CallCow does not sync events back from Calendly. The integration creates new bookings. It does not read or modify existing events in your Calendly calendar. For two-way sync, use a custom webhook setup instead, covered later in this article.
To disconnect, remove the integration from CallCow and revoke the personal access token on the Calendly API and webhooks page. After revocation, CallCow has no further access to your Calendly account.
TidyCal setup
TidyCal is a lifetime-deal scheduling tool popular with small businesses, freelancers, and consultants. The integration uses an API key, similar to Cal.com.
Step 1. Go to tidycal.com/integrations/oauth and log in to your account.
Step 2. Click Generate API Key.
Step 3. Copy the API key.
Step 4. Open your CallCow dashboard and go to the Integrations tab.
Step 5. Select TidyCal and paste the API key.
Step 6. Select the event type you want the AI to book. This is the specific appointment type that will be available during phone calls.
Step 7. Save the integration.
There is a critical limitation with TidyCal. Paid bookings cannot be booked through the API. If your TidyCal event requires payment at the time of booking, the AI receptionist will not be able to create it. This only applies to events with payment requirements. Free appointments book without issues.
Businesses that charge for initial consultations or require deposits will hit this wall. You would need to either create a free event type in TidyCal for phone bookings and handle payment collection separately, or use a different scheduling platform that supports paid bookings through its API.
To disconnect, remove the integration from CallCow and revoke the API key in your TidyCal settings.
Trafft setup
Trafft is a booking and appointment management platform used by service-based businesses, particularly salons, spas, and wellness studios. The integration requires both an API key and a Service ID.
Step 1. Log in to your Trafft admin panel.
Step 2. Navigate to Account Settings.
Step 3. Click on Features and Integrations.
Step 4. Search for "API" in the integrations list.
Step 5. Click Set up to enable the API.
Step 6. Copy the API key and any additional secrets shown on the screen.
Step 7. Open your CallCow dashboard and go to the Integrations tab.
Step 8. Select Trafft and paste the API key and secrets.
Step 9. Enter the Service ID for the specific service you want the AI to book. You can find your Service IDs in your Trafft dashboard under your service listings.
Step 10. Save the integration.
You can select multiple services for a single Trafft integration. However, if you run different workflows for different services (for example, one AI workflow for haircuts and another for massages), create a separate integration for each service. This lets you map specific services to specific workflows.
There is an important limitation with Trafft. The integration always books the first available employee for the selected time slot. You cannot specify a particular staff member during the booking. If a caller requests a specific person, the AI cannot guarantee that employee will be assigned. The booking goes to whoever is free at that time.
That's a Trafft API constraint, not something CallCow controls. If your business relies on customers booking with specific staff members, Trafft may not be the right fit for AI phone scheduling. You might consider Cal.com or Calendly instead, where event types can be configured per team member.
To disconnect, remove the integration from CallCow and revoke the API key in your Trafft admin settings under Features and Integrations.
Calendar comparison table
| Calendar | Auth method | Booking type | Key limitation |
|---|---|---|---|
| Google Calendar | OAuth (beta) | Direct calendar | Beta, may change |
| Outlook Calendar | OAuth (beta) | Direct calendar | Beta, may change |
| Cal.com | API key | Through Cal.com | Key must never expire |
| Calendly | Personal token | Through Calendly | Single user only, no event sync back |
| TidyCal | API key | Through TidyCal | Paid bookings excluded |
| Trafft | API key + Service ID | Through Trafft | Always picks first available employee |
| Zapier | Invite only | Webhook-based | Currently invite-only |
Google Calendar and Outlook Calendar are the simplest options if you manage availability in a standard calendar app. No separate scheduling platform needed.
Cal.com and Calendly work well if you already use a scheduling tool and want your AI receptionist to book into the same system your website visitors use.
TidyCal is cost-effective but the paid booking restriction limits its usefulness for businesses that charge upfront.
Trafft works for service businesses but the lack of employee selection makes it a poor fit for businesses where clients expect to choose their provider.
Zapier integration exists but is currently invite-only.
If you are deciding which path to implement, use this shortcut:
- Pick Google Calendar or Outlook Calendar if you want the simplest direct setup and you already manage availability in your calendar app.
- Pick Cal.com or Calendly if your business already depends on a scheduling platform and you want phone bookings to land in the same system.
- Avoid TidyCal for phone-booked paid appointments.
- Avoid Trafft if callers must choose a specific staff member.
For a broader comparison of how AI scheduling works across different business contexts, see the AI appointment scheduling guide.

Not sure which integration fits? Start a free trial and test with your own calendar
Custom webhook for unsupported calendars
If your scheduling tool is not on the supported list, you can still make it work through webhooks. CallCow sends a POST request to any URL you specify after a call completes. The payload includes the full conversation transcript, a summary, form fills, and caller context.
The webhook approach works differently from native integrations. With a native integration, the AI books directly into your calendar during the call. With a webhook, the AI collects the appointment details during the call, then your own server processes the booking after the call ends.
There is a delay, and it matters. The caller can be told their request was captured, but the actual booking happens only after the call is over when your webhook handler creates the event in your scheduling system. If you need the slot locked live during the call, use a supported calendar integration instead of the webhook fallback.
To set up a custom webhook:
- Build an endpoint on your server that accepts POST requests with JSON payloads.
- In your CallCow dashboard, go to the Integrations tab and create a new webhook.
- Paste your endpoint URL.
- Update your workflow metadata to reference the webhook. This tells the workflow to send call data to your endpoint after each completed call.
- In your endpoint code, parse the payload and create a booking in your calendar system using its API.
The webhook payload includes these fields:
call_idfor deduplicationcall_status(success, not_picked_up, etc.)call_summarywith the AI-generated summarymessagesarray with the full transcriptcontextwith caller name, email, and phoneform_fillswith any structured data collected during the call
You can use the form_fills data to extract appointment date, time, and service type. Then make an API call to your scheduling platform to create the booking.
Implement idempotency on your end. Use call_id as a unique identifier so duplicate deliveries or repeated processing do not create duplicate bookings.
If you use Make.com, you can skip building a custom server entirely. Make.com has native webhook support and can receive CallCow payloads, then push data to hundreds of other services. The Make.com integration guide covers the bidirectional setup. If you are thinking about Zapier instead, note that CallCow's native Zapier app is currently invite-only. A generic catch-hook flow can still work, but it is not the same as a full native integration.
For businesses using forms to collect structured caller data, the AI voice agent forms guide explains how to set up data collection templates that feed directly into your webhook payloads.
Pros and cons of AI calendar integration
Pros
- Callers book appointments during the call without needing to click a link
- Real-time availability checking means no double bookings
- Works 24/7, so after-hours callers still get scheduled into open slots
- Eliminates back-and-forth scheduling emails and text messages
Cons
- Only works with supported platforms (Google Calendar, Cal.com, Calendly, TidyCal, Trafft)
- TidyCal cannot handle paid bookings through its API, only free appointments
- Trafft always assigns the first available employee, no staff member selection
- Calendly tokens are tied to a single user account, not organizations
- Google Calendar and Outlook Calendar integrations are in beta and may change
If this article helped you narrow the decision, the next step is not more research. Choose the supported calendar you already use, connect it in CallCow, and run one live test call from start to booked appointment. That will tell you faster than another comparison post whether phone-based scheduling fits your workflow.
FAQ
Can the AI book appointments in real time during the call?
Yes. With native calendar integrations (Google Calendar, Outlook Calendar) and third-party scheduling integrations (Cal.com, Calendly, TidyCal, Trafft), the AI checks availability and creates bookings during the live phone call. The caller gets confirmation before hanging up.
What happens if a calendar integration stops working?
The AI will not be able to check availability or create bookings. The call still connects and the AI can still answer questions and collect information, but scheduling will fail. Check your integration status in the CallCow dashboard regularly. For API key integrations, keys that expire will cause silent failures. This is why the Cal.com setup explicitly requires a key set to never expire.
Can I use multiple calendars at the same time?
Yes. You can set up multiple integrations in CallCow. Each workflow can reference a different calendar integration. For example, you might use Calendly for consultation bookings in one workflow and Google Calendar for follow-up appointments in another.
Does the AI send calendar invites to callers?
The booking creation depends on your scheduling platform. Cal.com and Calendly typically send confirmation emails with calendar invites automatically when a booking is created. Google Calendar and Outlook Calendar can also send invites depending on your settings. Check the notification settings in your scheduling platform to confirm.
How does this work for after-hours calls?
The AI receptionist handles calls 24/7 regardless of your business hours. When a caller requests an appointment outside your working hours, the AI checks your calendar and books the next available slot. The caller does not need to wait until you are open. This is covered in more detail in the after-hours answering service guide.
Can callers reschedule or cancel through the AI?
Treat rescheduling and cancellation as integration-specific behavior, not a guaranteed documented feature. Some scheduling platforms may support it through their APIs, but CallCow's docs focus on booking flows. Test that exact workflow with your chosen calendar tool, or handle it through your own webhook logic.
Yiming Han is the founder of CallCow and writes about phone automation, missed calls, and the tradeoffs that show up when small businesses actually deploy voice AI.