How to transfer AI calls to a human agent
How to set up AI call transfer to a human with CallCow. Covers static and dynamic routing, Twilio Business Profile setup, webhook examples, and limitations.How to transfer AI calls to a human agent
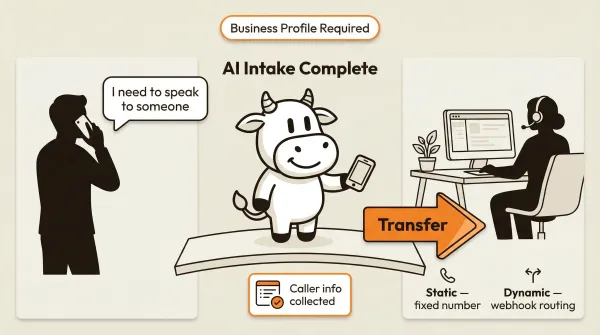
AI call transfer to a human is the process of handing off a live phone call from an AI voice agent to a real person. The AI handles the initial conversation, collects information from the caller, and then bridges the call to a human agent when the conversation needs a person. CallCow supports two methods: a static transfer to a fixed phone number, and a dynamic transfer that uses a webhook to route calls based on caller context. This sits on top of CallCow's BYOC Twilio model, so your Twilio account, verification status, and billing matter. The full setup instructions are in the CallCow docs.
Table of contents
- What AI call transfer to a human means
- How AI call transfer works
- Quick decision framework: transfer vs voicemail transfer vs message-taking
- Prerequisite: Twilio Business Profile
- Step-by-step setup: static transfer
- Step-by-step setup: dynamic transfer via webhook
- Dynamic transfer webhook example
- What CallCow does not do: warm transfer
- Pros and cons of AI call transfer
- Frequently asked questions
What AI call transfer to a human means
Most businesses using an AI virtual receptionist hit the same wall eventually. The AI can handle a large share of routine calls well: questions, bookings, qualification, and basic routing. But some callers still want a person, and some situations require human judgment. The transfer feature bridges that gap.
The AI stays on the line until it determines the caller needs a human. It collects the caller's information during the conversation. Then it hands the call off to a real phone number. The caller hears ringing on the other end and gets connected to your team.
This is different from the AI taking a message and hanging up. With transfer, the caller stays on the line and speaks to a human in real time. The transition happens within the same call.
For businesses comparing an AI phone answering service against a traditional virtual receptionist, this is the feature that matters most. Can the AI escalate to a human when it needs to? CallCow can. The setup follows.
How AI call transfer works
CallCow offers two transfer methods. They solve different problems.
Static transfer
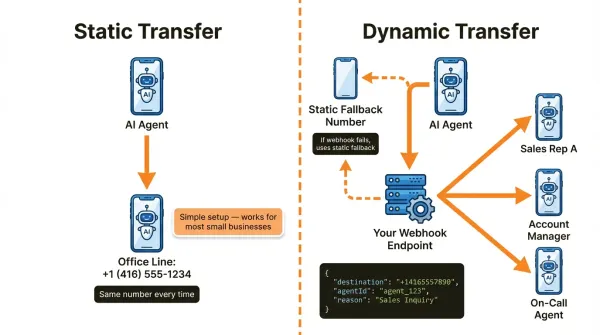
A static transfer routes every escalated call to the same phone number. You configure one destination number in your CallCow dashboard. When the AI decides to transfer, it sends the call to that number every time.
This works for small businesses with a single office line or a solo operator who wants calls forwarded to their cell phone. It is the simpler option. Set it once and forget it.
Dynamic transfer via webhook
A dynamic transfer sends a POST request to your server at the moment of transfer. The payload includes the caller's phone number. Your server responds with the destination number. This lets you route calls based on who is calling, what time it is, which department they need, or any other data your server can look up.
Use cases for dynamic transfer:
- Route callers to different sales reps based on territory
- Send existing customers to account management and new callers to sales
- Route based on business hours (office during the day, on-call person at night)
- Load balance across multiple agents using your own round-robin logic
If the webhook request fails or your server does not return a valid number, CallCow falls back to the static transfer number. This means you should always configure a static number as a safety net even if you plan to use dynamic routing.
Quick decision framework: transfer vs voicemail transfer vs message-taking
Not every call needs a live handoff. Use this shortcut.
| If your priority is... | Best option | Why |
|---|---|---|
| A caller reaches a real person right now when the AI cannot finish the call | Live transfer | Best when escalation needs to happen during the same call. Choose static transfer for one fixed destination, or dynamic transfer if you need your own routing logic. Requires an approved Twilio Business Profile. |
| You want humans to answer first, and only send missed calls to AI | Voicemail transfer | Usually the best customer experience for small teams. Your phone rings normally, and if nobody answers, carrier voicemail forwarding sends the missed call to CallCow. Not available on all carriers, and setup is carrier-specific. |
| You do not need a live handoff, but you do need the caller's details and reason for calling | Message-taking | Best when speed matters less than clean intake. Let the AI collect the caller's name, phone, reason for calling, and any form fields you need, then send that data to your team after the call. |
The practical rule: use live transfer for urgent escalations, voicemail transfer for general inbound coverage, and message-taking when a same-call human conversation is optional.
Prerequisite: Twilio Business Profile
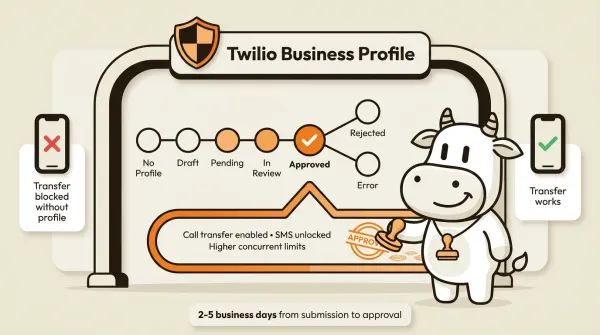
This is the part that trips people up. Call transfer does not work without a Twilio Business Profile. Not a little bit. Not on trial accounts. Not with a workaround. It is a hard requirement from Twilio, and CallCow uses Twilio for all voice infrastructure.
What is a Twilio Business Profile?
A Twilio Business Profile is an identity verification process. You submit your business information to Twilio through their console. Twilio reviews it and confirms you are a legitimate organization. Once approved, you get access to capabilities that are locked for unverified accounts.
CallCow uses a bring-your-own-carrier (BYOC) model. You connect your Twilio account to CallCow. That means Twilio's rules apply to your account, including the Business Profile requirement for call transfer.
Why Twilio requires it
Call transfer is an outbound call. The AI has been talking to a caller on an inbound call, and transfer means placing a new outbound call to the destination number. Twilio requires identity verification for outbound calling to prevent fraud, spam, and abuse. Without a verified Business Profile, Twilio blocks outbound calls from your account.
The seven profile statuses
Understanding the statuses helps you plan. The review process takes a few business days, and knowing where you stand prevents confusion.
| Status | What it means |
|---|---|
| Profile approved | Verification complete. Full capabilities unlocked. Transfer works. |
| Profile in review | Twilio is actively reviewing your submission. Wait. |
| Profile pending | Submitted but not yet in review. Normal for the first 24-48 hours. |
| Profile draft | You started but did not submit. Finish the form. |
| Profile rejected | Twilio denied it. Fix the issues and resubmit. |
| Profile error | Something went wrong on Twilio's end. Contact their support. |
| No profile | You have not started. This is where everyone begins. |
For details on each status, see Twilio's Business Profile documentation.
Most profiles move from pending to in review to approved within two to five business days. Rejections happen when the submitted information is incomplete or inconsistent. If you get rejected, read Twilio's feedback carefully, fix the specific issues they flag, and resubmit.
What else the Business Profile unlocks
Transfer is not the only capability tied to verification. An approved Business Profile also unlocks SMS sending, higher concurrent call limits, and configurable calls per second (CPS) for outbound dialing.
Trial accounts without a Business Profile are limited to four concurrent calls and can only call verified phone numbers. Once your profile is approved, those restrictions lift. For businesses planning to use list calling at scale or run multiple AI receptionist workflows simultaneously, the profile is essential.
How to create your Business Profile
- Log in to the Twilio Console
- Navigate to Account, then Business Profiles
- Click Create a Business Profile
- Fill in your business information (legal name, address, business type, use case)
- Submit and wait for review
After approval, the benefits apply automatically to all phone numbers on your Twilio account. You do not need to reconfigure anything in CallCow. The system detects the approved profile and enables transfer.
For a broader look at how CallCow works as an AI receptionist for law firms, including call handling beyond transfer, see that guide.
Step-by-step setup: static transfer
Assuming your Twilio Business Profile is approved, the static transfer configuration takes a few minutes in the CallCow dashboard.
Step 1: Create a call transfer integration
Open the CallCow dashboard and navigate to the Integrations section. Find Call Transfer and click to create a new integration.
Enter the phone number you want calls transferred to. Use E.164 format (e.g., +14165551234 for a Toronto number, +12125551234 for New York). This is the number your team will pick up when the AI transfers a call.
Test the number. CallCow lets you verify that the number is valid and reachable before saving. A wrong number here breaks your transfer flow, so test it before you rely on it.
Step 2: Enable transfer in your workflow
For basic workflows, find the Call Transfer section and select the integration you just created.
For custom workflows, open the workflow editor and go to Edit Metadata. Add the call transfer integration there. The AI will use this configuration whenever the workflow is triggered.
Step 3: Tell the AI when to transfer
Your workflow prompt or system instructions should include guidance on when to transfer. The AI makes the decision based on your instructions. Without clear guidance, it might try to handle everything itself or transfer too aggressively.
Examples of transfer triggers you can define:
- "Transfer to a human if the caller asks to speak with a person"
- "Transfer if the caller mentions a complaint or legal issue"
- "Transfer if the caller's question is about pricing for enterprise accounts"
- "Transfer if the AI cannot answer the question after two attempts"
Be specific. The AI follows your instructions, so vague rules lead to inconsistent behavior.
For transfer decisions specifically, we recommend selecting GPT 5.4 as the LLM model for your workflow. It produces more reliable decision-making with fewer hallucinations in our testing, which matters when the AI needs to correctly identify when a caller should be escalated versus handled within the workflow. There is a slight latency increase, but the accuracy improvement is worth it for transfer logic. You can set this per-workflow in LLM Models settings.
Step 4: Test the full flow
Call your CallCow number from a personal phone. Have a conversation with the AI and trigger a transfer. Confirm that your team's phone rings and that you can pick up and talk to the caller.
Check for two things during testing. First, is there audio on both sides after transfer? The caller should hear your team and your team should hear the caller. Second, does the caller hear ringing while waiting for pickup? They should. If they hear silence, something is misconfigured.
Not sure if static or dynamic transfer is right for you? Start a free trial and test both at callcow.ai.
Step-by-step setup: dynamic transfer via webhook
Dynamic transfer adds a server-side routing layer between the AI and the destination. Instead of always calling the same number, CallCow asks your server where the call should go.
Step 1: Create the call transfer integration
Same as static. Create the integration in the CallCow dashboard and enter a fallback phone number. This number gets used if your webhook fails.
Step 2: Build your webhook endpoint
Create an HTTP endpoint on your server that accepts POST requests. The endpoint receives the caller's phone number and returns a destination number. Your server can use any logic you want to determine the destination: database lookups, CRM queries, time-of-day routing, load balancing.
Step 3: Configure the Dynamic Transfer URL
In the call transfer integration settings, find the Dynamic Transfer URL field. Enter your endpoint URL. CallCow will POST to this URL every time a transfer is triggered.
The URL must be publicly accessible. It cannot be localhost or a private IP. Use HTTPS. CallCow sends the request at the moment of transfer, so your server needs to respond quickly. If the request times out or returns an error, CallCow uses the static fallback number.
Step 4: Test with different callers
Call your CallCow number from different phones. Verify that your webhook receives the POST request and returns the correct destination number for each caller. Test failure scenarios too: take your webhook server down and confirm that calls fall back to the static number.
If you are setting this up for the first time, do not over-engineer it. Start with static transfer if one person or one office line handles escalations. Move to dynamic transfer only when you need routing by territory, business hours, or CRM data. And if most calls should go to your team first with AI covering only missed calls, skip live transfer and set up voicemail transfer instead.
If you want to test the real workflow end to end, start with one number, one transfer destination, and one clear escalation rule. That is enough to learn whether live transfer actually improves your call flow before you build webhook routing. You can do that in the trial at callcow.ai.
Dynamic transfer webhook example
Here is the exact format CallCow uses for the webhook request and response.
Request from CallCow
When the AI triggers a transfer, CallCow sends this POST request to your Dynamic Transfer URL:
{
  "number": "+15551234567"
}
That is the entire payload. The number field is the caller's phone number in E.164 format. Use this to look up the caller in your database, CRM, or routing table.
Response from your server
Your endpoint should return a JSON response with a transferNumber field:
{
  "transferNumber": "+15559876543"
}
The transferNumber must be a valid phone number in E.164 format. CallCow will dial this number and bridge the caller through.
Example server implementation
Here is a minimal Node.js example:
const express = require("express");
const app = express();
app.use(express.json());

const routeTable = {
  "+15551110001": "+15559876001",
  "+15551110002": "+15559876002",
};

app.post("/transfer-route", (req, res) => {
  const callerNumber = req.body.number;
  const destination = routeTable[callerNumber] || "+15559876000";
  res.json({ transferNumber: destination });
});

app.listen(3000);
In production, your routing logic would be more sophisticated. You might query a CRM to check whether the caller is an existing customer, look up their assigned account manager, check business hours to determine whether to route to the office or an on-call number, or implement round-robin distribution across multiple agents.
Error handling
If your server returns anything other than a valid transferNumber, or if the request times out, or if your server returns a non-200 status code, CallCow falls back to the static transfer number you configured in the integration. This failover is automatic. You do not need to handle it on your end, but you should be aware that it happens.
Log the requests your webhook receives. If you see transfers consistently falling back to the static number, check your server logs for errors. Common issues include the server being down, the response format being wrong (missing the transferNumber key), or the response taking too long.
Ready to set up dynamic routing? If you want to test it on your own number, CallCow has a trial at callcow.ai..
What CallCow does not do: warm transfer
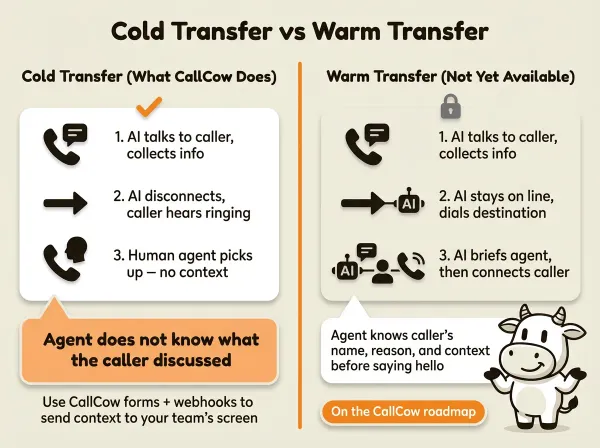
CallCow does cold transfer only. Also called blind transfer. The AI drops off the call, the caller hears ringing, and then your human agent picks up. The agent has no context about what the caller discussed with the AI.
A warm transfer would look different. The AI would stay on the line, brief the human agent on what the caller needs, and then connect them. The caller would not hear ringing. The agent would know who they are talking to and what the conversation is about before they say hello.
CallCow does not do warm transfer. Here is why, and what you can do about it.
The technical reason
The important documented limitation is simpler than the telecom architecture: CallCow does not support warm transfer today. If your workflow depends on the AI briefing a human live on the same call, treat that as unsupported rather than something you can configure around.
The practical workaround
Even without warm transfer, the AI can still capture context for your team. CallCow's forms feature lets the AI collect structured data during the conversation: the caller's name, the reason for calling, account number, urgency level. This data gets included in the webhook payload that fires when the call completes.
The workflow looks like this. The AI talks to the caller and fills out the form. When the AI transfers the call, the human agent picks up cold. After the call completes, the webhook can send the summary and any form data to your CRM, helpdesk, or internal system for follow-up and recordkeeping.
It is not the same as the AI briefing the agent live, and it does not solve the warm-transfer gap. Use it as a post-call context trail, not a real-time handoff mechanism.
A few more things that help compensate for the lack of warm transfer:
Forms: The AI can collect structured data (name, reason for calling, urgency) using CallCow's 6 field types before transferring. The human agent gets context as soon as the call summary arrives in your CRM or helpdesk.
SMS Instructions: During the handoff, the AI can text the caller a case number or callback link. If the agent needs to call back later, the caller already has a reference point.
Inbound Contacts: Caller data persists after transfer. Phone number, name, and notes are saved automatically in CallCow, so your team can look up the caller's history even without a live briefing.
When cold transfer works fine
For many businesses, cold transfer is acceptable. If you have a small team where everyone knows the callers, or if the AI handles the intake and your team only deals with specific escalations, the lack of context handoff is not a major problem.
It becomes a problem in larger operations where the person picking up the transferred call has no idea who the caller is or what they want. If that describes your business, factor this limitation into your decision and compare it against human receptionist services or phone systems built around live-agent handoff.
For a deeper comparison of AI answering against traditional receptionist services, see our guide to AI vs traditional answering services.
Pros and cons of AI call transfer
Pros
- The AI handles intake and only escalates when necessary, which saves human time
- Static transfer is simple to configure and works for most small businesses
- Dynamic transfer via webhook gives you full routing control based on any logic
- Automatic fallback to the static number if the webhook endpoint fails
Cons
- Cold transfer only: the human agent has no context from the AI conversation
- Requires a Twilio Business Profile, which takes a few business days to approve
- The transfer destination needs its own voicemail setup if nobody picks up
- Docs do not describe a built-in retry flow if the destination number does not answer
Who this is for (and who it's not)
Good fit:
- CallCow users who want the AI to handle intake and escalate only when the caller asks for a person or the conversation exceeds the AI's capabilities
- Small teams where everyone knows the callers and cold transfer (no briefing) is acceptable
- Developers who want dynamic routing via webhook: route callers to different reps based on territory, time of day, or CRM data
Not a good fit:
- Businesses where warm transfer is a hard requirement. CallCow does cold/blind transfer only: your team picks up without any context from the AI conversation
- Teams that need retry logic when the transfer destination doesn't answer. If nobody picks up, the caller hears ringing until they hang up
- Anyone who hasn't set up a Twilio Business Profile yet. Transfer won't work without it, and approval takes a few business days
- Large operations needing built-in queuing or native round-robin distribution. You would need to build your own routing logic around CallCow's transfer webhook
Frequently asked questions
How do I transfer an AI call to a human?
Set up a call transfer integration in your CallCow dashboard. Enter a destination phone number and save it. Then enable the integration in your workflow settings (Edit Metadata for custom workflows, or the Call Transfer section for basic workflows). The AI will transfer calls to that number when your instructions tell it to. You need an approved Twilio Business Profile before transfer works.
What is cold transfer vs warm transfer?
Cold transfer (blind transfer) means the AI disconnects from the call and the caller is bridged directly to the human agent. The agent has no context about what happened before the transfer. Warm transfer means the AI stays on the line and briefs the human agent before connecting them. The agent knows who the caller is and what they need before speaking to them. CallCow supports cold transfer only.
Do I need a Twilio Business Profile for call transfer?
Yes. Call transfer is an outbound call from Twilio's perspective, and Twilio requires identity verification for outbound calling. Without an approved Business Profile, the transfer will not go through. Creating a profile takes a few business days. Start the process in your Twilio Console under Account, then Business Profiles.
Can AI route calls to different departments?
Yes, through dynamic transfer. Set a Dynamic Transfer URL in your call transfer integration. When the AI triggers a transfer, CallCow sends a POST request to your URL with the caller's phone number. Your server responds with the destination number. You can implement any routing logic: department-based, agent-based, time-based, or lookup-based. If the webhook fails, CallCow falls back to your static transfer number.
Can I transfer calls to an international number?
Treat international transfers as a Twilio-account question rather than a CallCow promise. Before you rely on that setup, verify the destination country, your account permissions, and any extra requirements directly in Twilio.
What happens if the transfer destination does not pick up?
CallCow's docs do not describe a built-in retry flow or transfer-to-voicemail fallback. Test your destination number behavior before going live, and make sure your own phone system handles missed transfers the way you want.
If you want to test one real escalation path, set up an AI voice agent with call transfer to your team in the trial at callcow.ai.
Yiming Han is the founder of CallCow and writes about phone automation, missed calls, and the tradeoffs that show up when small businesses actually deploy voice AI.